


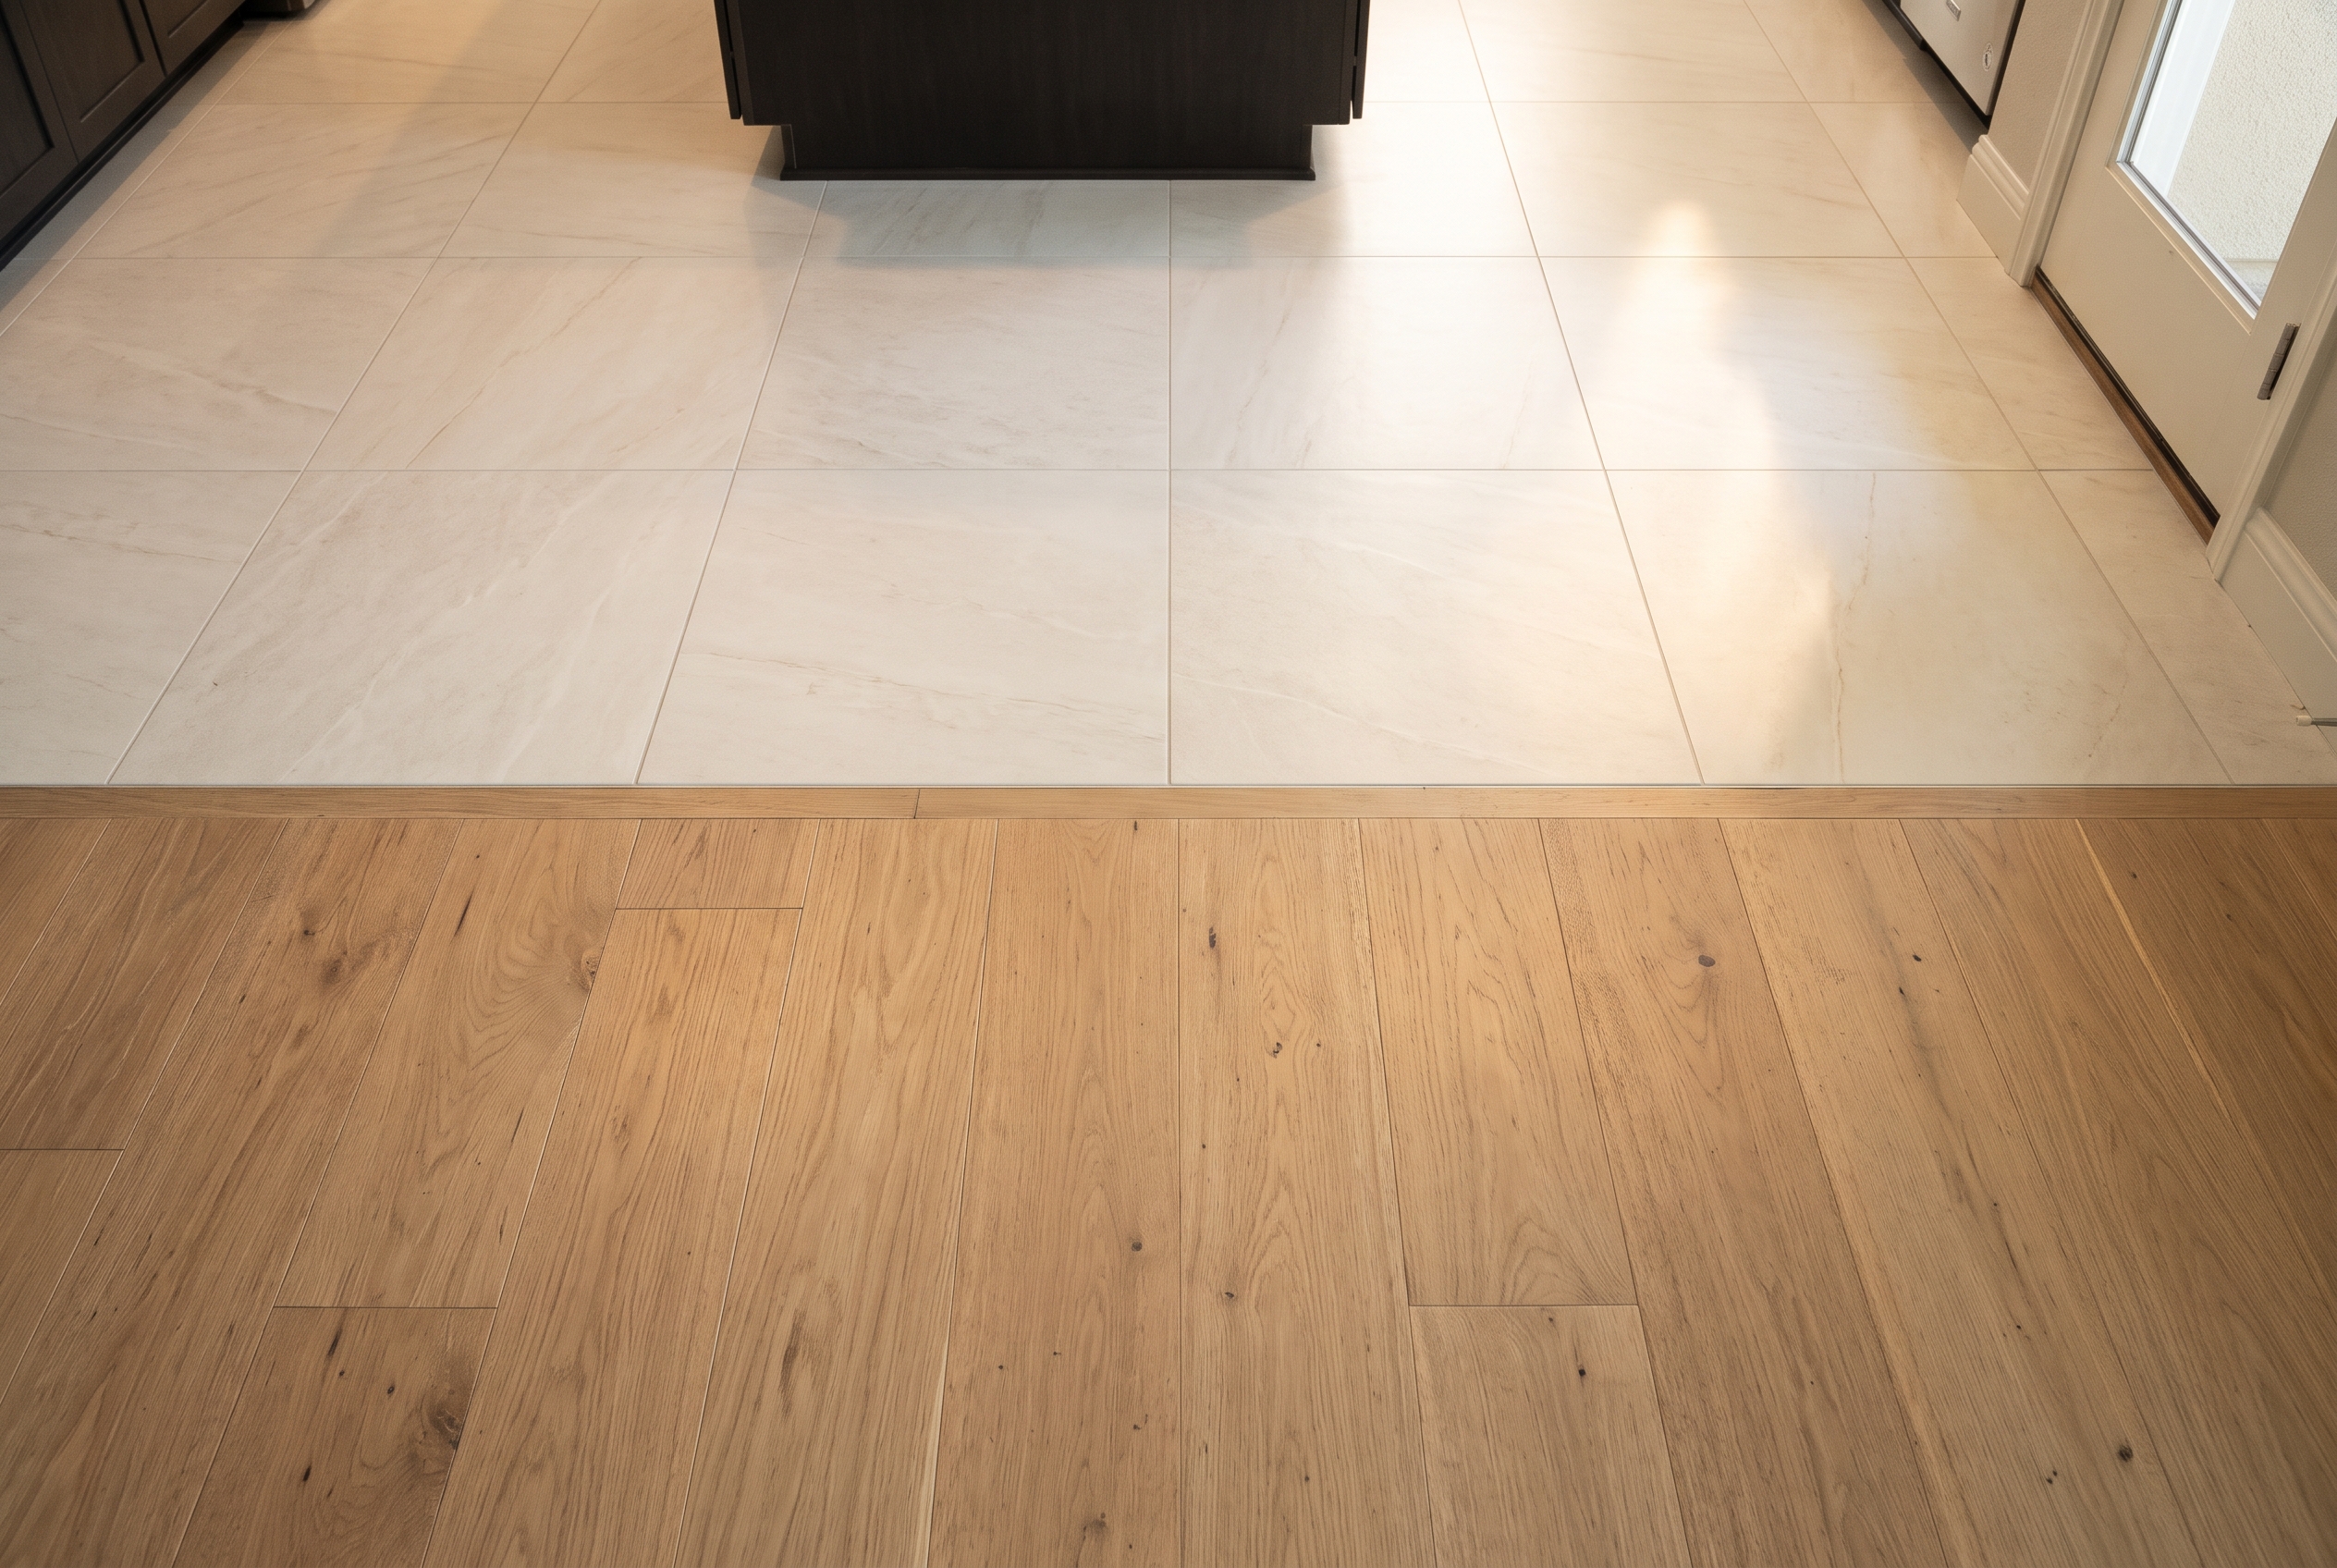
A flooring transition is the line where one floor ends and another begins, along with whatever sits on that line. Sometimes that is a strip of wood or metal. Sometimes it is a thin flexible joint you barely notice. Sometimes it is nothing at all.
Three decisions settle almost every transition in a house: where the line falls, whether the two floors meet at the same height, and what sits on the line. Get the first two right and the third mostly takes care of itself.
The short version is this. Change floors where the house already changes, such as under a door, at the end of the kitchen cabinets or at the edge of the entry. Bring the two floors to the same height before either one goes in. Use a strip only to cover a height difference you could not close.
The table below shows what normally sits between each pair of floors and when a strip is unavoidable.
| Floors that meet | What usually sits between them | When you need a strip |
|---|---|---|
| Hardwood and tile | A narrow joint, about 1/8 inch wide, filled with flexible silicone that matches the grout | Only when the two floors sit more than about 1/16 inch apart in height |
| Hardwood and carpet | A wood carpet trim or a metal binder bar that the carpet edge tucks under | Always, because the carpet edge needs something to tuck under |
| Tile and carpet | A metal carpet edge set at the tile, or a stone saddle at a bathroom door | Always, for the same reason |
| Hardwood or tile and luxury vinyl or laminate | Nothing when the thinner floor is built up level; otherwise a reducer that slopes down to it | Whenever the thinner floor was not built up to match |
| The same floor running through a doorway | Nothing for a nailed or glued floor; a T-molding for a floating floor | Only for a floating floor, and only where its manufacturer's instructions call for one |
Should Every Floor in an Open Floor Plan Be the Same?
No, and most open-plan homes look better with two. The usual pattern is one floor through the kitchen, dining and living areas, with a second material only where there is a practical reason for it: tile where water lands, carpet where you want warmth and quiet underfoot.
The number that matters is how many floors you can see from one spot. Stand at the kitchen island and turn around. Two materials in view are easy to make look intentional. Three can work when the two hard floors share an undertone, but it takes more care.
The mistake people notice is the near match. Two oak floors a shade apart at a doorway, or a wood-look tile beside real wood of almost the same color, look like a repair that did not quite match. A clear contrast looks like a decision.
Wood-look tile next to real hardwood can work when the tile is plainly a different color, such as a pale, limed-looking plank beside a medium brown oak. If you want the two rooms to match, the simpler answer is to use the wood-look tile in both and skip the real wood.
Some homes are better with one floor everywhere. A small main floor feels larger as a single surface. A bold patterned tile or a dramatic wide plank looks best with nothing competing beside it. A kitchen open on three sides has no natural line for a change, so the floor should run straight through.
The way to run one floor through a kitchen without giving up water resistance is a wood-look plank. A waterproof luxury vinyl plank can go from the front door through the kitchen and into the family room as one surface, with tile saved for the bathrooms and the laundry room. A wood-look porcelain tile does the same thing in a harder material.
If you still want zones, a rug under the dining table or in front of the sofa creates them without a second floor and without a transition to build.
How to Choose Colors and Undertones So Two Floors Look Planned
Keep the undertone the same and let the color differ. Warm goes with warm and cool goes with cool. Your eye forgives a different color across a doorway, but it notices a different temperature every time you walk through.
A honey oak beside a cream, limestone-look porcelain looks like one warm scheme. The same oak beside a blue-gray, concrete-look tile looks like two different houses.
Test the samples where the floors will actually meet, not on a counter in a showroom:
- Lay the two samples side by side on the floor at the exact spot where the line will fall, in the afternoon light that room gets.
- For a bedroom, put the carpet sample at the door with the hall sample next to it and look at both from the hallway, because that is how you will see them every day.
- Hold the grout sample against both floors. Grout in a shade close to the tile, and in the same warm or cool family as the wood, keeps the tile from turning into a grid beside the planks.
- Let the carpet pick up one tone from the wood grain or the tile. A carpet that shares a note with the hard floor ties the house together.
One more rule of thumb: a light floor beside a dark one makes the darker room feel smaller. If one of the two rooms is already the small one, give it the lighter floor.
Where Should One Floor Stop and the Next Begin?
Use the lines your house already has. Doorways, the end of a cabinet run, the outer face of the island, the step down into the entry and the wall line of a wide opening are all natural borders. A floor that changes in the middle of an open space looks like a repair, because a transition is a border and a border needs an edge to sit on.
Painter's tape settles these questions faster than a drawing. Tape every candidate line on the floor, live with it for a weekend, and you will know which ones feel right.
Under a door, the change goes directly beneath the door when it is closed, so each room sees only its own floor. At a cased opening, which is a doorway with trim but no door, the change goes at the wall line and never a foot inside the room.
Two spots have their own rules. A fireplace hearth is its own border of tile or stone, and the wood stops at it with a small gap for movement. An exterior door, including a sliding glass door, gets a threshold where the floor ends, which covers the floor's expansion gap and keeps the weather seal off the planks.
In the Kitchen, Stop the Tile at the Island or the End of the Cabinets
In a kitchen that opens to the family room, run the tile to the ends of the cabinet run or to the outer face of the island, and let the wood start there. Both lines are straight, both are already drawn by the cabinets, and both keep the working part of the kitchen on tile.
If stools sit on the living side of the island, carry the tile past the island far enough to cover the stools when they are pulled out. That is about 2 to 3 feet past the counter edge, squared off in a straight line.
The line matters because of what happens on each side of it. Spills, dropped dishes and the path between the refrigerator, the sink and the stove belong on tile. The dining table and the sofa belong on wood. A line that leaves the refrigerator door swinging over hardwood, or the sofa's front legs on tile, will bother you every day.
Other layouts have their own natural lines:
- A galley or L-shaped kitchen with no island: stop at the ends of the cabinets, squared across the opening.
- A peninsula: run to the end of the peninsula and square across to the opposite wall.
- A kitchen with a beam, a ceiling change or a step: use that line, since the house already drew it.
Where Should the Entry Tile Stop?
Give the entry a tile pad big enough for two people and a wet umbrella, squared to the front door, and start the wood at the pad's far edge. Grit and water come in on shoes, and tile is the easiest floor to keep clean there.
Make the pad a deliberate rectangle. A border row of tile around it, or a frame of planks run the other way, tells the eye the edge was chosen.
Size the pad so it ends on a full tile, because a pad that ends on a sliver looks cut short. If the entry has no wall to stop at, choose an entry tile in a size that lands on a full tile at the pad's edge.
The door from the garage is an entry too, and in most homes it carries more traffic and more grit than the front door. The tile in the laundry room or mudroom is the pad there, with the change under the door into the hall.
If your household comes home dusty from the Folsom Lake trails, our guide to scratch-resistant flooring covers what that grit does to each floor and why the first few feet inside the door matter most.
Where Should Carpet Start at Bedroom Doors and on the Stairs?
Carpet starts directly under the bedroom door, tucked under a trim that matches the hall floor. With the door closed, the hall shows hard floor and the bedroom shows carpet, and neither room sees the other's floor.
On a two-story home, the upstairs hall decides what happens on the stairs. If the upstairs hall is carpet, the carpet comes down the stairs, wraps the bottom riser and tucks into the hard floor at the foot of the stairs under a trim or binder bar. The hard floor runs right up to the bottom step.
If the upstairs hall is hard floor, that floor comes down the stairs too, with a stair nose on every tread, and the carpet begins at each bedroom door. A carpet runner down wood stairs is the third option. The wood shows on both sides, each tread keeps its wood nosing, and the runner needs no strip at all.
The stair nose is also a safety edge. It is what your toe finds in the dark, so it should never be left as a square-cut plank.
Whether carpet or hardwood is better on your stairs depends on noise, wear and who climbs them, and it is worth deciding before you settle the line at the bottom step.
How to Bring Two Floors to the Same Height
Add up each floor's finished thickness before you buy anything, and plan to build up the thinner floor until the two meet within about 1/16 inch. Floors vary more in thickness than they appear to, and that difference is most of what a transition has to solve.
Finished thickness means the height above the subfloor once everything is in place. For tile, that includes the thinset, which is the mortar the tile is set in, and the cement backer board or membrane under it. For carpet, it includes the pad.
| Floor | Finished thickness above the subfloor |
|---|---|
| Solid hardwood | About 3/4 inch |
| Engineered hardwood | About 3/8 to 3/4 inch; most are 1/2 to 5/8 inch |
| Tile on a concrete slab | About 3/8 to 1/2 inch, including the thinset |
| Tile on a wood subfloor | About 5/8 to 3/4 inch, including backer board or a membrane and the thinset |
| Luxury vinyl plank | About 1/16 to 5/16 inch, from a thin glue-down plank to a thick rigid-core plank |
| Laminate | About 5/16 to 1/2 inch |
| Carpet on pad | About 1/2 to 7/8 inch, and it compresses underfoot |
The floor you cannot change sets the target. In most homes that is the existing tile, because tile tends to stay while everything around it is replaced. Measure how high that tile stands above the subfloor at the line where the new floor will meet it, and choose the new floor's build-up to land there.
A floor is raised from underneath, and there are four common ways to do it:
- A plywood underlayment under a nailed or floating floor. A 1/4-inch or 1/2-inch layer lifts a thin engineered plank, a laminate or a luxury vinyl plank by that amount, where the flooring manufacturer allows a layer under it.
- A thicker plank. On a concrete slab, where plywood is harder to fasten, choosing a 5/8-inch engineered plank instead of a 3/8-inch one is the simplest way to gain 1/4 inch. A self-leveling underlayment poured over the slab is the other option when the plank alone cannot close the gap.
- A thicker membrane under new tile. An uncoupling membrane is the plastic mat set under tile to keep subfloor movement from cracking it, and it comes in more than one thickness. The thicker versions exist mainly to bring tile level with 3/4-inch hardwood.
- A thicker pad under carpet, within the limit the carpet's manufacturer allows. The residential installation standard caps the pad at 7/16 inch.
Lowering a floor is rarely possible. A thinner pad brings carpet down a little, and a thinner tile build-up helps only while the tile is still to be set. Nothing lowers a floor that is already down except taking it up.
A change in height reaches the doors and the baseboards too. A floor built up by 1/4 inch can stop a door from swinging, so interior doors sometimes need trimming at the bottom. A new floor thinner than the carpet it replaces opens a gap under the baseboard, which a shoe molding or a new baseboard closes.
Why Hardwood Meets Tile with a Gap, and What Fills It
Wood swells when the air is damp and shrinks when it is dry. In the Sacramento Valley, that means a wood floor widens a little each wet winter and pulls back each dry summer, and the tile beside it does not follow.
So where the two meet, the wood is held back from the tile by a narrow joint, about 1/8 inch wide, and that joint is filled with flexible silicone rather than grout. Grout is rigid. Put it in that joint and it cracks the first dry summer, because the wood pulls away from it. Color-matched silicone stretches and recovers instead, and from standing height it looks like one more grout line.
A small joint is enough at the tile because the floor's seasonal movement is spread across its whole width and taken up mostly at the walls, where the installer leaves a gap of 1/2 inch or more hidden under the baseboard. The joint at the tile only has to absorb the movement of the planks nearest it.
Summer is the season that moves a wood floor most here. The same dryness that opens hairline gaps between boards in August is what pulls the whole floor back from a rigid edge. If you have noticed your hardwood floors separating in late summer, you have already seen the movement this joint is designed for.
Engineered boards move less than solid ones in this climate, which is one reason they are the usual choice on a slab. Our engineered versus solid hardwood guide explains why.
A properly made joint has three parts you can ask about. A foam backer rod sits in the bottom of the joint so the silicone bonds only to the two sides, which lets it stretch. The sealant is 100 percent silicone rather than an acrylic caulk, which hardens. And it is tooled flat and slightly below the surface so a chair leg or a shoe does not catch it.
This is not just a wood-floor rule. The tile industry's installation handbook, published by the Tile Council of North America, requires a movement joint wherever tile meets a different flooring material, kept free of grout and filled with a backer rod and a flexible sealant. The silicone joint satisfies both floors at once.
Silicone does not last forever. After several years it has collected dirt and lost some of its stretch, and it is cut out and run again in a few hours.
Protecting the Tile Edge at a Transition
The cut edge of a tile at a doorway is its weakest point. Left bare, it chips the first time a vacuum head or a suitcase wheel hits it squarely. Protect it with a metal edge profile set into the thinset along the last row, or with a strip that stands a hair higher than the tile and takes the hit instead.
Metal profiles come in three shapes. A straight L-shaped profile sits flush along the tile edge when the two floors are level. A sloped profile ramps down from the tile to a lower floor. A T-shaped profile straddles two hard floors of the same height, with its stem down in the joint between them.
Rectified porcelain, which has a sharp, square-cut edge, chips more easily than tile with a softened or rounded edge, so it needs the profile most. A bullnose tile, or a wood threshold that overlaps the tile, does not need one, because no cut edge is exposed. Our porcelain versus ceramic guide explains what rectified means and when it is worth paying for.
Which Transition Strip Goes Between Which Floors?
The height difference chooses the strip. The table sorts them out, and the notes below it describe what each one looks like.
| Strip | Floors it joins | Height difference it handles |
|---|---|---|
| T-molding | Two hard floors, usually the same floor on both sides of a doorway | None to about 1/8 inch |
| Reducer | A thicker hard floor stepping down to a thinner one | Up to about 1/2 inch; beyond that, build the lower floor up instead |
| Carpet trim or binder bar | A hard floor meeting carpet | From level with the carpet to a little above it |
| Threshold | A floor ending at an exterior door, a slider or a hearth | None; it covers the expansion gap at a fixed edge |
| End cap | A floating floor ending at a slider track, a hearth or tile that stands higher | None, or a small step up to the fixed edge |
| Stair nose | A floor meeting the edge of a step | A full step |
| Metal edge profile | Tile meeting any other floor | None when the floors are level, or a slope down to a lower floor |
A T-molding is a flat-topped strip about 2 inches wide with a stem underneath. The stem sits in a gap between the two floors, and the top covers the gap and both floor edges. It joins two level floors, and it is what a floating floor needs at a doorway so the floor can move under it.
A reducer is a wedge. One edge sits level with the thicker floor and the other slopes down to the thinner one. It is the usual choice between 3/4-inch hardwood and a vinyl plank, or between tile and a thinner floor, when the lower floor was not built up.
A carpet trim, sometimes called a baby threshold, is a wood strip with a square outer edge and a lip the carpet tucks under. The metal version is a binder bar, a strip with teeth that grip the carpet backing and a rolled edge that covers the cut.
A threshold is a wider flat strip that finishes a floor where it ends on its own, at an exterior door, a sliding door or a hearth. It covers the expansion gap and overlaps the floor's edge without being fastened to it.
An end cap, also called a square nose, does the same job for a floating floor, with a squared edge that stops at a slider track or a tile edge.
A stair nose caps the front edge of a tread. The flush version sits level with the floor behind it. The overlap version sits slightly higher and covers the floor's edge, and it is the one a floating floor uses.
Every one of these is fastened to the subfloor, or to a track screwed to the subfloor, and not through the floor it covers. This matters most for a floating floor, which is designed to move as one sheet. A strip nailed through its planks pins it in place, and a floating floor that cannot move buckles.
How Should Hardwood or Engineered Wood Meet Tile?
You have four choices, and the heights narrow them down. If the two floors are within about 1/16 inch, they can meet flush with the silicone joint described above. If they are within about 1/8 inch, a T-molding covers the small difference and gives the wood extra room to move.
If the wood stands higher, a wood reducer slopes down to the tile. If the tile stands higher, a sloped metal profile set at the tile edge ramps down to the wood.
Flush is the look most people want in an open plan, because the two floors read as one surface. A T-molding makes more sense at a door that is usually closed, where nobody sees the joint and the extra movement room is welcome.
If you want a visible line between the kitchen and the living room because it marks the rooms, that is a perfectly good reason to choose a molding even when the heights would allow flush.
How Should Hardwood Meet Carpet?
The hard floor goes in first. A carpet trim matching the hall floor is fastened to the subfloor on the door line, and the carpet is stretched over a tack strip on the bedroom side and tucked into the gap under the trim's lip. What you see when it is done is a narrow strip of the hall's wood under the door and a carpet edge tucked tight with no backing showing.
That tuck gap, which installers call the gully, has a rule of its own. The Carpet and Rug Institute's residential installation standard, CRI 105, sets it slightly narrower than the carpet is thick and never wider than 3/8 inch, so the edge stays tight. The same standard says the carpet edge at any transition is protected or covered by a molding, and that tack strip is not run across the door opening itself.
A wood trim matches the hall floor and all but disappears. A metal binder bar does the same job and holds up better to luggage wheels and rolling chairs, so it is the sensible choice in a hallway that takes that kind of traffic.
How Should Tile Meet Carpet?
The tile goes in first, grouted and cured before any carpet comes into the room, because thinset and grout do not come out of carpet pile. A metal carpet edge is set at the tile's last row, and the carpet is stretched and tucked under its lip the same way it is at a wood floor.
Which metal edge you need depends on the order of the work. When both floors are new, an edge with a lip for the carpet is set in the thinset along the tile. When the carpet is staying and only the tile is new, a Z-shaped bar hooks the existing carpet edge instead. When the tile stands higher than the carpet, a sloped edge bridges the drop.
A bathroom door is the one place where a stone saddle is the better answer. A saddle is a low strip of stone, usually marble, humped slightly in the middle and set under the door. The tile meets its wet side, the carpet tucks to its dry side, and the hump stops water that reaches the door from running into the carpet.
How Should Hardwood or Tile Meet Luxury Vinyl Plank or Laminate?
Luxury vinyl plank is the thinnest floor in the house, so beside tile or 3/4-inch hardwood it needs either a build-up to come level or a reducer that slopes down to it. Laminate sits between vinyl and engineered wood in thickness and follows the same rule.
If you are still choosing between the two, our laminate versus LVP comparison covers the differences that matter in a kitchen.
The common pairings work out like this:
- Vinyl plank beside existing tile on a slab: the tile is low and the plank is thin, so the gap is often only 1/8 to 1/4 inch. A thicker rigid-core plank, or a thin underlayment where the plank's manufacturer allows one, closes it for a flush line. Otherwise a low reducer finishes it.
- Vinyl plank beside 3/4-inch hardwood: a drop of about 1/2 inch, which is the most a reducer should be asked to cover. Building the plank up on a plywood underlayment gives a cleaner result.
- Laminate beside tile on a wood subfloor: often close enough in height for a T-molding, with the laminate's expansion gap under it.
- Laminate beside solid hardwood: a reducer sloping down from the wood, or an underlayment under the laminate.
Where a floating plank floor ends at a hearth, a slider track or a taller tile, an end cap finishes it. Where it passes through a doorway, the manufacturer's instructions decide whether a T-molding is required, which brings us to the next question.
Do You Need a Strip Where the Same Floor Runs Through a Doorway?
A nailed-down or glued-down floor does not need one. It runs through the doorway as one piece and takes its seasonal movement at the walls.
A floating floor is different, because the whole floor moves as one sheet. Most manufacturers cap how far a floating floor may run in each direction before a T-molding has to break it into sections. Many also call for one in a narrow doorway, where the opening pinches the sheet, and at the corners of an L-shaped or T-shaped space.
Those limits are in the instructions for the product you choose, and your installer should know them before the layout is drawn.
Changing the direction of the planks is the other case. If the same wood runs lengthwise down the hall and crosswise in a bedroom, the two directions meet at the door. That joint takes either a T-molding or a header board, which is a single plank laid across the opening that both runs butt into. When the heights are equal, the header board is the cleaner look.
Can You Skip the Strip for a Flush, Seamless Look?
Yes, if the two floors are brought level during the installation and the wood keeps its silicone joint. The catch is that a flush line has to be planned before either floor is bought, because the heights are decided by what you order and what goes under it.
Four things have to be true:
- The finished heights match within about 1/16 inch.
- The subfloor is flat along the whole line, because a large tile or a long plank bridges a dip and the joint shows the difference.
- The tile edge is protected by a metal profile or finished a hair below the wood so it cannot chip.
- The line is dead straight. A flush joint has no top to hide a wander, so the tile is cut to a snapped line and the wood is laid to it.
What you get is a floor that looks like one surface from the front door to the back slider. What you give up is forgiveness: a joint that needs resealing every few years, and no cover for a subfloor that was not quite flat.
A strip is still the better answer in a few places. At a door that stays closed, nobody sees the joint and a T-molding gives the wood more room. Where the two floors will be replaced on different schedules, a molding lets each floor come up on its own, while a flush joint ties them together.
And in a hallway full of rolling luggage or office chairs, a T-molding takes abuse that a silicone joint will not.
If you do go flush, a few design moves make the line look intended rather than merely level. A single row of tile along the line, or a frame of planks run the other way around a tile field, turns the change into a deliberate border. Lining the grout joints up with the plank joints gives the two floors a shared rhythm.
Running the planks perpendicular to the tile line, so their ends meet it squarely, is cleaner than a long plank edge running alongside it.
Which Strip Material and Finish Should You Choose?
Match a strip to the floor it belongs to. Wherever the strip is part of a wood floor, use a wood strip from the floor's manufacturer in the same species and finish, and order it with the floor so both come from the same production run.
Wherever the strip protects a tile edge, use a metal profile in the finish of the room's faucet and door hardware: brushed stainless, matte black, brass or bronze.
A few other cases come up often:
- A refinished floor rarely has a factory-matched strip, so an unfinished wood strip stained on site to match is the answer there.
- A bathroom door gets a stone saddle, ideally from the same stone family as the bathroom tile.
- Wet rooms get stone or metal and never wood, because a wood strip at a shower door swells.
- A vinyl four-in-one molding, which can be trimmed into a T-molding, reducer, end cap or carpet edge, is fine in a closet or utility room where nothing else fits.
What Goes Wrong at a Transition, and How Is It Fixed?
Most transition failures have a cause you can name and a fix smaller than it looks.
A strip that rocks, lifts or comes loose was glued to a dusty subfloor or nailed through the plank it was supposed to float over. The fix is a new strip set in a track, or in fresh adhesive on a clean subfloor, with nothing fastened through the floor.
A gap or cracked grout where tile meets wood means grout went where silicone belonged, or the silicone was run thin with no backer rod and let go on one side. The joint is cut clean, a backer rod goes in and the silicone is run again.
A chipped tile edge at a doorway was left bare. The damaged tile is replaced from the spare box, and a metal profile goes into fresh thinset along the edge so the next one is protected.
Carpet fraying at the strip means the edge was never tucked tight, or a dented binder bar let it go. The carpet is re-stretched onto the tack strip, the edge is recut and sealed, and a new trim or bar goes on. The carpet itself is rarely the problem.
A lip that catches a toe or a walker is measured before it is fixed. The clearest benchmark comes from the ADA Standards, which were written for public buildings but are useful in any home with an older household.
Under those standards, a vertical change of up to 1/4 inch is acceptable as it is. A change between 1/4 and 1/2 inch must be beveled so it rises no more than 1 inch over 2 inches of run. Anything over 1/2 inch needs a ramp.
A lip inside those limits is fixed with a reducer or a sloped profile. A step beyond them means the lower floor comes up and goes back down on a build-up.
A floating floor that buckled at a doorway either had no T-molding or had one nailed through the planks, so the two rooms pulled against each other until the floor lifted. The floor is cut back to restore the gap it should have had, and the molding goes on a track so the floor can move under it.
Flooring repairs and carpet re-stretching are among the services we offer. The one transition problem that is not a small repair is a height difference that was never matched in the first place, where one floor sits more than 1/2 inch above the other and a strip has been covering it. That calls for the build-up that should have gone in originally, and it is handled as part of a floor installation rather than as a repair.
What Changes in the Slab-Built Homes Around Roseville
Most homes in Roseville, Rocklin, Lincoln and Folsom were built from the 1980s onward on concrete slabs, and the typical home dates from the late 1990s or later. Builders of that era usually put ceramic tile in the entry, the kitchen and the bathrooms and carpet everywhere else.
So the most common transition job here is a new floor in the family room meeting builder tile that stands only about 3/8 to 1/2 inch above the slab.
That low tile works in your favor. A glue-down engineered floor, a thick luxury vinyl plank or a laminate all finish within about 1/4 inch of it. That 1/4 inch is closed with a thicker plank, a thin underlayment under a floating floor, or a self-leveling underlayment under a glued one.
A flush line between the family room and the kitchen is a realistic goal in these homes. It is harder in a home with tile built up to 3/4 inch on a wood subfloor.
The slab rules one floor out of the flush plan. A 3/4-inch solid hardwood floor is nailed down, and nailing needs a plywood subfloor built over the concrete first. That assembly stands well above the builder's tile. On a slab, the floors that meet tile cleanly are the ones that glue down or float: engineered hardwood, luxury vinyl plank and laminate.
In most of these homes the builder's carpet meets the tile under a plain metal bar. Replacing that carpet with a hard floor is the natural moment to replace the bar with something you chose.
The older streets near downtown Roseville, and many of the custom homes toward Loomis and Granite Bay, sit on raised foundations with a wood subfloor. There the arithmetic changes: a nailed solid floor is possible, the tile sits higher on its backer board, and the two still meet flush when the heights are worked out before anything is ordered.
Two local facts affect every transition here. Our dry summers put the silicone joint between wood and tile to work harder than a damp climate would, so it should always have a backer rod under it. And in the active-adult neighborhoods around Roseville and Lincoln, the 1/4-inch lip limit is worth building to from the start, because a flush floor stays safe underfoot as a household ages.
How Granite Bay Flooring and Design Helps You Plan the Lines
At Granite Bay Flooring and Design in Roseville, we carry the hardwood, tile and carpet that meet in an open floor plan, along with luxury vinyl plank and laminate, and our own crews install all of them, tile included.
Choosing the floors is easier with the samples on your own floor, in your own light, at the spot where the line will fall. Our shop-at-home service brings the samples to you, and a design consultation helps you settle undertones and layout before anything is ordered.
A free in-home measurement is where the heights get settled. The floors that are staying are measured where the new ones will meet them, the candidate lines are looked at on your floor, and what sits at each line is decided before the order goes in. When the work starts, we can move the furniture out and haul away the old carpet.
We are family-owned and have been in the flooring business for more than 45 years. Our showroom is on Sierra College Boulevard in Roseville, and we install throughout Granite Bay, Roseville, Rocklin, Lincoln, Folsom, El Dorado Hills, Loomis, Citrus Heights, Antelope and Orangevale.
Questions People Ask About Flooring Transitions
Can You Replace a Metal Transition Strip with a Wood One Without Replacing the Floors?
Yes, as long as the height difference is one a wood T-molding or reducer can cover. The old strip comes out, the floor edges are cleaned of old adhesive, and the new strip is set in a track or glued across the same gap. On a slab the new strip is glued, since there is nothing to nail into.
The exception is a metal bar that has been covering a drop bigger than a reducer handles. A wood strip will not hide a large step any better than the metal did. That is a build-up job, not a strip swap.
How Wide Is a Transition Strip?
A wood T-molding or reducer is about 2 inches wide. A metal edge profile shows anywhere from a thin line of metal, for a straight edge, to about 1 1/4 inches for a sloped one. Manufacturers sell wood strips in lengths of roughly 6 1/2 to 8 feet, so a standard doorway takes a single piece with no joint in it.
A 2-inch strip across a wide cased opening looks heavy. A wide opening is where a flush joint or a header board is worth the extra planning.
Is a T-Molding a Trip Hazard?
A properly set T-molding is not. Its top sits only about 1/4 inch above the floors on either side, and its edges are beveled, which keeps it within the benchmark the ADA Standards use for a change in level. A T-molding that has worked loose and rocks is a different matter, and it should be re-set before someone catches a toe on it.
Should the Transition Strip Match the Floor or the Baseboard?
Match it to the floor. A strip is part of the floor, and a white-painted strip across a wood floor looks like a mistake unless the whole opening is framed in painted trim and the strip is clearly part of that frame. Metal profiles follow the room's hardware rather than the trim, because they belong to the tile.
Seeing Where Your Floors Should Meet
The floors you are choosing will meet somewhere, and the line is easier to draw on your own floor than on paper. Book a free in-home estimate and we will measure the floors that are staying, look at where each new floor could stop, and talk through which transitions can be flush and which need a strip, before you order a single plank.


